Concrete tripping hazards can pose a serious risk to the safety of pedestrians and property owners alike. Whether it’s a cracked sidewalk, uneven steps, or sunken driveways, these hazards can lead to accidents, injuries, and costly lawsuits. In this comprehensive guide, we will explore the causes of concrete tripping hazards, the importance of repairing and preventing them, and provide you with a step-by-step guide to address these issues.
By following these guidelines, you can ensure the safety of those who walk on your concrete surfaces and avoid potential legal liabilities.
Concrete Tripping Hazards
Concrete tripping hazards are a common problem faced by property owners and municipalities. They can occur due to a variety of factors, including natural wear and tear, weather conditions, poor construction, or heavy foot traffic.
These hazards often manifest as cracks, uneven surfaces, or sunken areas on sidewalks, driveways, or parking lots. While they may seem like minor inconveniences, they can pose significant risks, especially to elderly individuals or people with mobility issues.
Understanding the Causes of Concrete Tripping Hazards
To effectively repair and prevent concrete tripping hazards, it is crucial to understand their underlying causes. One of the primary causes is the natural settling of the ground, which can lead to uneven surfaces over time. Additionally, extreme weather conditions such as freeze-thaw cycles or heavy rainfall can cause the concrete to crack or shift.
Poor construction practices, including inadequate compaction or insufficient reinforcement, can also contribute to the formation of tripping hazards. Identifying and addressing these causes is essential for long-term solutions.
The Importance of Repairing and Preventing Concrete Tripping Hazards
Repairing and preventing concrete tripping hazards is not only for the safety of pedestrians but also for property owners. Neglecting these hazards can result in serious injuries, potential lawsuits, and reputational damage.
By taking proactive measures to address these issues, property owners demonstrate their commitment to safety and reduce the risk of accidents. Regular maintenance and timely repairs can also increase the lifespan of concrete surfaces and save money in the long run.
Assessing the Severity of Concrete Tripping Hazards
Before undertaking any repair work, it is essential to assess the severity of the concrete tripping hazards. This evaluation will help determine the appropriate course of action and the level of urgency.
Minor cracks or surface imperfections may only require cosmetic repairs, while more significant hazards may necessitate a full reconstruction. Engaging the services of a professional can provide an expert evaluation and ensure that the correct approach is taken.
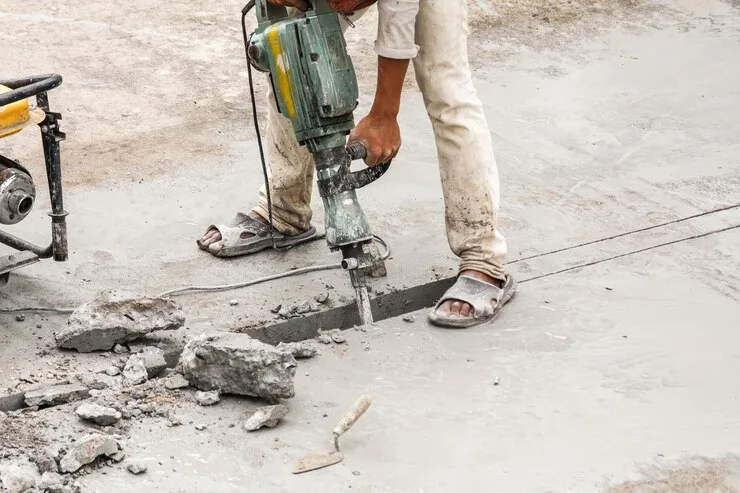
Tools and Equipment Needed for Concrete Repair
Concrete repair can involve a variety of tasks, ranging from fixing small cracks in a sidewalk to restoring large sections of a concrete structure. The tools and equipment needed for concrete repair can vary depending on the scale and complexity of the job. Here’s a list of commonly used tools and equipment for concrete repair:
Basic Tools for Small Repairs

- Chisel and Hammer: For chipping away loose and damaged concrete.
- Wire Brush: To clean the repair area, removing dirt and loose particles.
- Trowel: For applying and smoothing patching materials.
- Masonry Brush or Paint Brush: To apply bonding agents or sealers.
- Mixing Tools: A bucket and a stick or a drill with a mixing paddle for preparing repair compounds.
- Safety Equipment: Gloves, goggles, and dust mask for personal protection.
Advanced Equipment for Larger Repairs
- Concrete Saw: For cutting out damaged areas or creating clean edges around the repair site.
- Jackhammer or Rotary Hammer: For removing larger sections of damaged concrete.
- Pressure Washer: To deeply clean the area, especially for surface repairs or before applying overlays.
- Concrete Mixer: For mixing larger quantities of concrete or repair mortar.
- Screed and Float: For leveling and finishing larger repair surfaces.
- Injection Equipment: For epoxy or polyurethane concrete crack repair.
Specialized Materials
- Patch Compound: Premixed concrete or mortar for filling holes and cracks.
- Bonding Agents: To ensure adhesion between the old concrete and the repair material.
- Epoxy or Polyurethane Resin: For repairing cracks, especially if they need to be structurally bonded.
- Sealer: To protect the repaired area and the surrounding concrete from water and weather damage.
Measuring and Testing Equipment

- Moisture Meter: To check the moisture content of the concrete before starting repairs.
- Crack Measuring Tools: For assessing the width and depth of cracks.
Additional Supplies
- Formwork Materials: For holding the repair material in place until it sets, especially for larger repairs.
- Reinforcing Steel or Wire Mesh: For structural repairs, to reinforce the concrete.
- Cleaning Supplies: Such as brushes, brooms, and vacuums for keeping the work area clean.
Before starting a concrete repair project, assess the extent of the damage and choose the right tools and materials for the job. For large or structurally significant repairs, it’s often best to consult a professional.
Step-by-Step Guide to Repairing Concrete Tripping Hazards
Repairing concrete tripping hazards involves a systematic approach to achieve optimal results. Here is a step-by-step guide to help you through the process:
- Prepare the area: Clear the affected area of any debris or loose concrete. Use a broom or a pressure washer to clean the surface thoroughly.
- Assess the damage: Identify the extent of the damage and determine if any underlying issues need to be addressed.
- Repair minor cracks: For hairline cracks, use a concrete sealer or epoxy filler to fill the gaps. Follow the manufacturer’s instructions for the best results.
- Fix larger cracks: For wider cracks, use a concrete patching compound. Apply the compound with a trowel, ensuring it is level with the surrounding surface.
- Address sunken areas: If the hazard is caused by sunken concrete, use a process called mud jacking or slab lifting to raise the affected area to its original position.
- Finish and cure: Smooth out the repaired area using a trowel or a float. Allow the repair to cure according to the product instructions before allowing foot traffic.
Preventing Future Concrete Tripping Hazards
Repairing concrete tripping hazards is only part of the solution. To ensure long-term safety, it is essential to take preventive measures. Here are some steps you can take to prevent future hazards:
- Regular inspections: Conduct routine inspections to identify any potential hazards before they become major issues.
- Prompt repairs: Address any minor cracks or surface imperfections promptly to prevent them from worsening.
- Proper drainage: Ensure that your concrete surfaces have adequate drainage to avoid water accumulation, which can weaken the structure.
- Quality construction: If you are constructing new concrete surfaces, hire reputable contractors who follow proper construction practices and use high-quality materials.
- Appropriate maintenance: Regularly clean and maintain your concrete surfaces to prevent the accumulation of dirt, debris, and chemicals that can cause damage.
Hiring a Professional for Concrete Repair and Prevention

While minor repairs can be done by property owners, more extensive concrete repair and prevention projects are best left to professionals.
Hiring a professional concrete contractor ensures that the job is done correctly, efficiently, and in compliance with safety standards. Professionals have the knowledge, experience, and specialized equipment to tackle even the most challenging projects. When selecting a contractor, make sure to verify their license, insurance, and reputation in the industry.
Common Mistakes to Avoid When Repairing Concrete Tripping Hazards
When repairing concrete tripping hazards, it is essential to avoid common mistakes that can compromise the effectiveness and longevity of the repairs. Some common mistakes to avoid include:
- Ignoring underlying issues: Addressing only the visible damage without identifying and addressing the underlying causes can lead to recurring problems.
- Using low-quality materials: Using subpar materials may provide temporary fixes but will likely result in the need for frequent repairs.
- Improper curing: Failing to follow the recommended curing time can weaken the repaired area and reduce its durability.
- Inadequate surface preparation: Neglecting to clean and prepare the surface properly can prevent the repair materials from adhering effectively.
- Lack of maintenance: Once the repairs are completed, it is essential to maintain the concrete surfaces regularly to prevent new hazards from forming.
Conclusion: Ensuring Safety Through Proper Concrete Maintenance
Concrete tripping hazards are a common concern for property owners, but with proper maintenance, repairs, and preventive measures, they can be effectively addressed. By following the step-by-step guide provided in this comprehensive guide, you can ensure the safety of pedestrians and protect yourself from potential legal liabilities.
Remember to conduct regular inspections, address any issues promptly, and hire professionals for more extensive repair and prevention projects. By prioritizing concrete maintenance, you contribute to safer communities and protect your property investment.
For professional concrete repair and prevention services, contact Rhino Concrete Lafayette. With our expertise and commitment to quality, we can help you address any concrete tripping hazards and ensure the safety of your property. Don’t compromise on safety – contact Rhino Concrete Lafayette today.